
Is your shuffleboard table actually level, or are you just playing on a very expensive curve? It's incredibly frustrating when a perfect shot veers off-course because of subtle shuffleboard table leveling problems. You've invested in a premium piece of home entertainment, and the fear of damaging that beautiful hardwood playfield while attempting a DIY fix is completely understandable. Most owners feel a bit of hesitation when they first look at the underside of their table and see those mysterious metal bars known as climatic adjusters.
We agree that your game nights deserve better than a tilted surface and unfair advantages. This guide promises to turn you into a confident curator of your own game room by teaching you how to diagnose, fix, and prevent leveling issues for a perfectly straight glide every time. We'll walk you through the nuances of wood expansion, explain exactly how to manipulate your table's hardware safely, and help you determine if the issue lies with the floor or the furniture itself. It's time to restore the professional polish to your play and ensure your investment remains a centerpiece of domestic warmth for years to come.
Key Takeaways
- Discover why a professional-grade surface is actually slightly concave and how to use the Drift Test to pinpoint hidden low spots.
- Resolve common shuffleboard table leveling problems by securing the cabinet and legs first to ensure a perfectly stable foundation.
- Master the mechanics of climatic adjusters to safely manipulate the wood playfield and restore a true, straight glide.
- Protect your investment by maintaining a "Game Room Climate" with humidity between 35-55% to prevent natural warping.
- Understand the long-term stability benefits of solid wood cabinets and thick, polymer-coated playfields found in premium collections.
Why Your Shuffleboard Pucks Drift: Diagnosing Leveling Problems
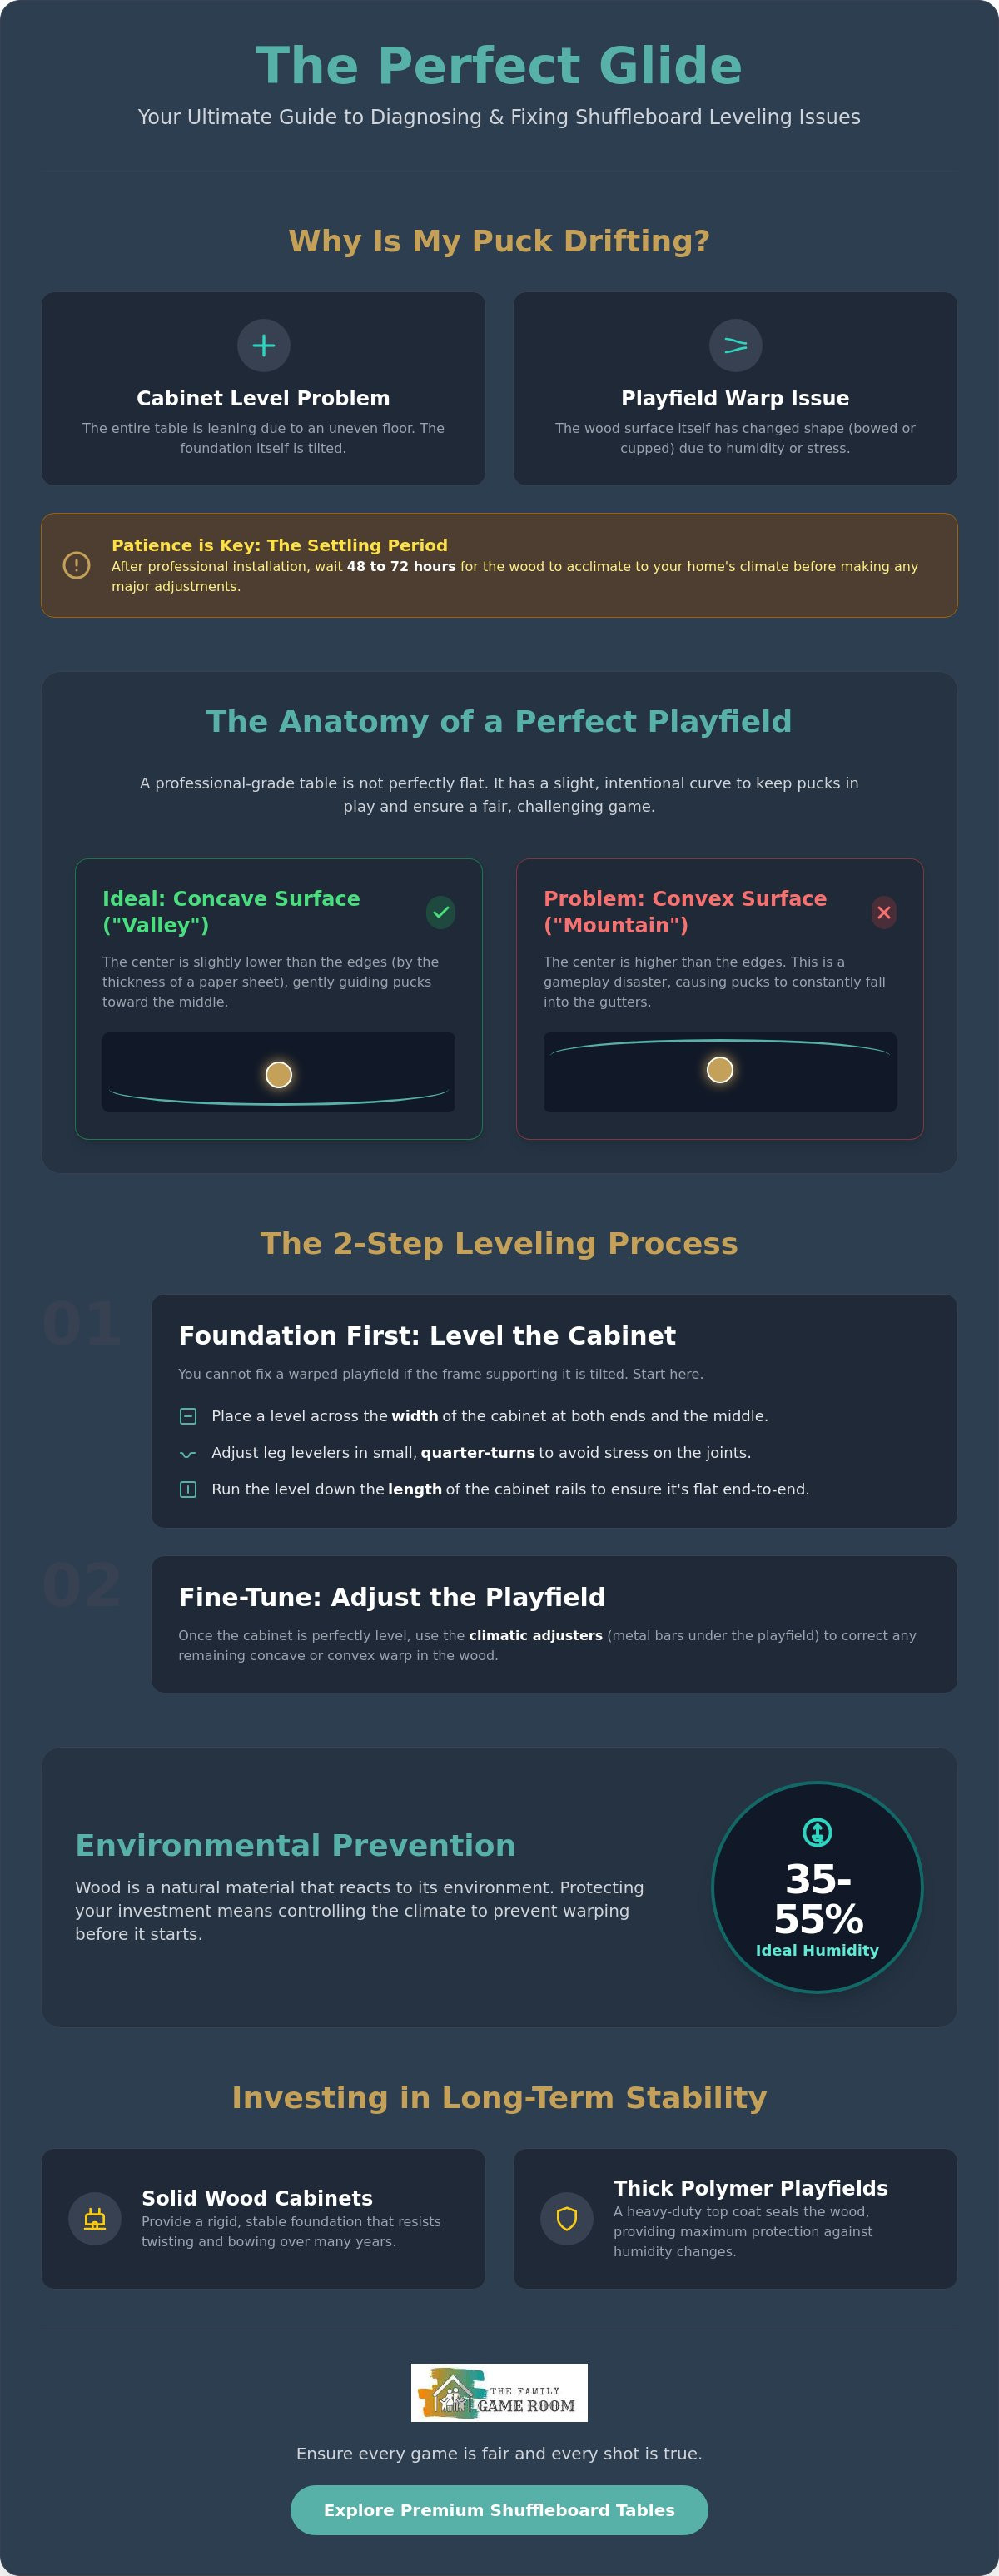
Your puck should glide true, but instead, it takes a mysterious turn toward the side. This is the classic symptom of shuffleboard table leveling problems. Before you reach for your toolbox, you need to understand what you're actually looking for. A "perfectly level" table in the world of Table shuffleboard isn't actually flat. It's designed with a very specific, intentional curve that ensures competitive play remains fair and exciting.
To start your diagnosis, perform the "Drift Test." Place a puck approximately six inches from the end of the playfield near the gutter. If the puck remains stationary, move it toward the center and release it with a gentle, straight push. If the puck consistently veers toward the same gutter regardless of your aim, you have a leveling issue. However, you must distinguish between a cabinet-level problem and a playfield-warp issue. A cabinet-level problem means the entire furniture piece is leaning because of an uneven floor. A playfield-warp issue means the wood itself has changed shape, requiring a different approach to fix.
Don't panic if your brand-new table seems slightly off immediately after professional installation. Every high-quality table requires a "settling period." Wood is a natural material that needs time to acclimate to the specific temperature and humidity of your home. We recommend waiting at least 48 to 72 hours after delivery before you begin making significant adjustments to the climatic adjusters.
The Science of the Shuffleboard Surface
A professional playfield is intentionally "concave." This means the center of the board is slightly lower than the edges, usually by about the thickness of a piece of paper. This subtle valley keeps pucks from falling into the gutters too easily. Most premium tables use butcher block construction, which involves laminating vertical strips of wood together. This method provides incredible strength, but it also means the wood reacts to domestic weight loads and gravity over a 12 to 22-foot span. Without this slight concavity, gravity becomes your enemy, and every shot becomes an exercise in frustration.
Identifying Concave vs. Convex Warping
You can identify the type of warp with a simple visual check or a straight-edge tool. A "valley" or concave surface is ideal, but too much concavity causes pucks to gravitate toward the dead center of the board. Conversely, a "mountain" or convex surface is a disaster for gameplay. In a convex scenario, pucks will constantly fall off toward the gutters no matter how carefully you throw. To check this accurately, place a carpenter's level or a straight-edge tool across the width of the playfield. If you can see light under the center of the level, the board is concave. If the level rocks back and forth on a high center point, your board is convex and needs immediate adjustment.
The Foundation First: Leveling the Cabinet and Legs
You cannot fix a warped playfield if the skeleton supporting it is leaning. Before you attempt to manipulate the wood with climatic adjusters, you must ensure the cabinet is perfectly plumb. Many owners make the mistake of only checking the wood surface, but the true path to solving shuffleboard table leveling problems begins with the cabinet rails. If the frame is twisted or tilted, any adjustments you make to the playfield will be temporary at best and damaging at worst. Applying the principles of precision leveling ensures that your table doesn't just look good, but performs with professional accuracy.
Stability is the hallmark of a premium game room. For tables ranging from 16 to 22 feet, checking the level at every single leg pair is mandatory. These long-format tables are heavy, and even a slight floor dip in the middle of the room can cause the frame to bow over time. If you're still in the planning stages for your home, exploring our collection of Indoor Shuffleboard Tables can help you find a model with heavy-duty levelers designed for maximum stability.
Step-by-Step Cabinet Alignment
Start by placing your level across the width of the cabinet at both ends and directly in the middle. Adjust the leg levelers in small, deliberate quarter-turns to avoid putting unnecessary stress on the joints. Patience is your best tool here. A bullet level provides a quick and efficient way to perform side-to-side checks during the process without moving your larger carpenter's level constantly. Once the width is set, run the level down the length of the rails to ensure the entire structure sits flat against the floor.
Floor Considerations and Stability
The surface beneath your table dictates how often you'll need to perform maintenance. High-pile carpet is notoriously deceptive. It feels soft underfoot, but it will compress under the massive weight of a solid wood table. Expect to perform a secondary "re-leveling" about a month after installation once the carpet fibers have fully settled. Hardwood and tile offer more immediate stability, but they are also more prone to showing floor imperfections.
Placement matters just as much as the floor material. Avoid placing your table directly over or near a floor vent. The localized heat or AC flow will dry out one side of the cabinet faster than the other, leading to frame twisting that is nearly impossible to correct. Ensure the cabinet weight is distributed equally across all legs to maintain the structural integrity of the piece. A balanced foundation is the only way to achieve that sought-after, professional-grade glide.
Climatic adjusters are the secret weapon of the shuffleboard world. These heavy-duty metal brackets, bolted directly to the underside of your playfield, allow you to physically bend solid wood. While the cabinet leveling we discussed earlier provides the foundation, these adjusters solve the internal shuffleboard table leveling problems caused by wood's natural response to its environment. They operate on a simple push-pull mechanical system. By manipulating the tension between the bolts on the bracket, you can either pull the center of the board down or push it up to achieve that perfect, slight concavity.
Patience is the most important tool in your kit. We call it the 48-Hour Rule. Wood is a living, breathing material; it won't react to mechanical pressure instantly. If you make an adjustment and don't see an immediate change, resist the urge to keep turning the wrench. Over-adjusting is the fastest way to cause "checking," which are hairline cracks in the expensive polymer finish. These cracks are often permanent and compromise the smooth glide of your pucks. Small, deliberate movements are the hallmark of a professional fix.
Fixing a Convex (Crowned) Surface
A convex or "crowned" surface is a nightmare for accuracy because pucks will constantly slide toward the gutters. To fix this, identify the adjusters directly beneath the highest point of the crown. You'll need to loosen the outer bolts and slowly tighten the inner bolts. This creates downward pressure on the center of the board. Only work on one or two adjusters at a time to keep the tension balanced across the entire length. Check your progress with a puck slide after 24 hours, but wait a full 48 before making another turn. This ensures the wood has fully reacted to the new tension before you apply more.
Correcting a Concave (Deep Valley) Surface
While a slight concavity is desired, a "deep valley" makes long-distance scoring nearly impossible as every shot gets sucked into the middle. To correct this, tighten the outer bolts on the climatic adjusters. This action pulls the edges of the playfield downward, effectively raising the center relative to the sides. For a 22-foot professional-grade table, you may need to coordinate adjustments across four or five different brackets. Small increments are key. A single half-turn can make a massive difference once the wood finally settles into its new shape. Always re-test with a straight-edge tool to ensure you haven't over-corrected into a crown.
Environmental Prevention: Humidity and the "Game Room Climate"
Solid wood is hygroscopic. It breathes, expanding and contracting as it absorbs or releases moisture from the air. This natural movement is the primary driver of shuffleboard table leveling problems over time. If you ignore the air quality in your home, even the most precise mechanical adjustments will eventually fail. To maintain a perfectly straight glide, you must treat your game room like a climate-controlled gallery. The gold standard for wood preservation is a consistent humidity level between 35-55% and a temperature range of 65-75 degrees Fahrenheit.
Seasonal transitions are particularly challenging for large hardwood furniture. When winter heaters kick in, the air dries out, often causing the board to shrink and crown. Conversely, summer humidity can cause the wood to swell, leading to a deep valley or "cupping." Expect to revisit your climatic adjusters during these major shifts to keep the surface true. High-quality Billiard Light Fixtures play a surprising role here; they provide the consistent, overhead illumination needed to spot these subtle surface imperfections before they ruin a game night.
Managing Room Humidity
A dedicated digital hygrometer is a required accessory for any serious shuffleboard owner. It provides the real-time data you need to act before the wood starts to move. In dry winter months, use a humidifier to prevent the playfield from shrinking and losing its intentional concavity. If your table lives in a basement, a dehumidifier is essential during the summer to prevent excessive swelling. Consistency is your best defense against structural warping and long-term damage.
Maintenance Beyond the Level
Sometimes, what looks like a leveling issue is actually a maintenance gap. Consistent use of shuffleboard wax, or silicone, can occasionally mask minor leveling issues, but it's no substitute for a flat surface. Clean the playfield regularly to ensure your "drift" isn't just a buildup of dirt or old, clumped wax. Proper lighting is equally vital. Shadows from inadequate lamps can make a level table look warped, leading to unnecessary and potentially harmful adjustments. If you're ready to upgrade your home entertainment setup, explore our premium Indoor Shuffleboard Tables to ensure every match is played under professional conditions.
Investing in Stability: The Benefits of Premium Tables
While we've explored the mechanics of maintenance, the most effective way to avoid chronic shuffleboard table leveling problems is to start with a superior build. Not every table is engineered to withstand the atmospheric pressures of a family home. High-end manufacturers, such as those featured in our guide to American Heritage Billiards Pool Tables and shuffleboards, utilize thick, polymer-coated playfields that act as a shield against moisture. This professional-grade construction doesn't just look better; it physically resists the warping that plagues entry-level models.
The difference often lies within the frame. Many mass-market tables use MDF (Medium Density Fiberboard) for their cabinets. While cost-effective, MDF lacks the structural memory of solid wood and can sag under its own weight over time. Solid wood cabinets provide the rigid support necessary for long-term level retention. Professional-grade climatic adjusters offer much more granular control than the thin, stamped-metal versions found on budget tables. These robust systems allow for micro-adjustments, providing a "set it and forget it" experience that lets you focus on the game rather than the hardware.
Materials Matter: Butcher Block vs. Synthetic
A 3-inch thick North American Maple playfield is the gold standard because its sheer density provides a massive amount of natural resistance against warping. The polymer finish isn't just for a smooth slide; it completely seals the wood, preventing the hygroscopic reactions that lead to shuffleboard table leveling problems. Heavier cabinets provide a more stable leveling base that resists shifting even when the room's foundation experiences minor seasonal movement.
Choosing Your Next Table
When evaluating your next investment, look closely at the underside. You want to see heavy-duty steel adjusters with clear, accessible threading. At The Family Game Room, we act as a trusted curator, selecting only brands with the most robust climatic adjustment systems to ensure your post-purchase happiness. Before you finalize your game room, use this checklist for a maintenance-free experience:
- Confirm the playfield is at least 2.5 to 3 inches thick solid wood.
- Verify the cabinet is solid hardwood or high-grade furniture-quality plywood rather than MDF.
- Ensure the table includes at least four to six climatic adjusters depending on the overall length.
- Check that leg levelers are made of reinforced steel with anti-skid bases for maximum floor grip.
By prioritizing craftsmanship and premium materials, you ensure that your shuffleboard table remains a source of domestic warmth and excitement for generations. A perfectly level game is the hallmark of a high-quality home, and starting with the right equipment makes that goal effortlessly achievable.
Restore Your Perfect Glide Today
Mastering the techniques of foundation-first leveling and precise climatic adjustment ensures that shuffleboard table leveling problems never interrupt your home entertainment again. You now possess the expert knowledge to diagnose drifts using the puck test and manage your game room's climate to prevent natural wood warping. By maintaining a stable environment and respecting the necessary settling periods of your table, you preserve both the competitive integrity of your matches and the long-term value of your investment. Every quarter-turn of a leveler brings you closer to that professional-grade experience your family deserves.
As an authorized retailer for American Heritage Billiards, we take pride in acting as a trusted curator for your home. Our expert support team remains dedicated to helping you navigate the technical specifications of high-end equipment with ease. If you're ready to upgrade to a surface engineered for timeless durability and superior stability, browse our collection of premium, stable Indoor Shuffleboard Tables built for professional-grade performance. We're here to ensure your next game night is defined by a perfectly straight glide and endless domestic warmth.
Expert Answers to Common Shuffleboard Questions
How often should I check the level on my shuffleboard table?
Perform a level check once a month or whenever the seasons shift significantly in your area. Rapid temperature changes in spring and fall cause natural wood to move, potentially leading to shuffleboard table leveling problems. Regular monitoring allows you to make minor, proactive adjustments before they impact your gameplay. If you notice pucks drifting consistently during a match, perform a quick drift test immediately to confirm the surface remains true.
What is the best tool for checking if my shuffleboard is level?
Use a high-quality 24-inch or 48-inch carpenter's level for the most reliable results. Place the tool across the width of the playfield to check for side-to-side levelness at every leg pair. For checking the intentional concavity of the board, a metal straight-edge is ideal. It allows you to visualize the tiny, paper-thin gap between the tool and the board center, ensuring you maintain the perfect valley required for professional play.
Can I level a shuffleboard table by myself or do I need a professional?
You can manage most leveling tasks yourself with basic tools and a bit of patience. Adjusting the leg levelers is a straightforward one-person job, though having a partner check the level while you turn the wrench saves time. For climatic adjusters, go slow and strictly follow the 48-hour rule. If the table frame appears severely twisted or the board is significantly warped, calling a professional installer is a wise investment to protect your playfield.
Why does my shuffleboard table seem to change level during the winter?
Winter heaters strip moisture from the air, causing the solid wood playfield to shrink as it dries. This often results in a "crowned" or convex surface where the center rises higher than the edges. Maintaining a consistent game room climate with a dedicated humidifier helps mitigate these seasonal shifts. Without humidity control, you'll likely find yourself adjusting the climatic adjusters every time the furnace kicks on for the season.
What happens if I over-tighten the climatic adjusters?
Over-tightening risks causing "checking," which are permanent hairline cracks in the expensive polymer playfield finish. In extreme cases, excessive mechanical pressure can even split the butcher block wood or strip the threads on the adjuster bolts. Always make small, quarter-turn adjustments and wait for the wood to react naturally. If the bolt feels extremely difficult to turn, stop immediately and re-evaluate your strategy to avoid causing costly structural damage.
Does the type of shuffleboard wax I use affect the level?
The type of shuffleboard wax, or powder, affects puck speed and friction but has no impact on the physical level of the table. However, old wax buildup can create artificial "bumps" that mimic shuffleboard table leveling problems. Clean your playfield thoroughly before checking the level to ensure you're measuring the actual wood surface rather than a layer of clumped silicone and dust. This ensures your adjustments are based on true data.
Is it normal for a shuffleboard table to have a slight dip in the middle?
Yes, a slight concavity is a standard design feature for professional shuffleboard play. The center of the board should ideally be about the thickness of a piece of paper lower than the edges. This subtle "valley" prevents pucks from falling into the gutters too easily during long-distance shots. If the dip becomes deep enough to trap pucks in the center, use your climatic adjusters to bring the surface back to the correct specification.
How long does it take for a shuffleboard table to "settle" after adjustment?
Allow at least 48 hours for the wood to fully settle after making any changes to the climatic adjusters. While you might see a small shift immediately, wood is a natural material that moves slowly under mechanical pressure. Checking the level too soon often leads to unnecessary over-correction. Be patient and perform a final puck drift test two days after your last turn of the wrench to confirm a perfect glide.