
A premium slate pool table is more akin to a high-performance engine than a standard piece of living room furniture. It requires a perfectly calibrated environment to function as intended. You've likely spent hours selecting the ideal design for your home, yet the logistics of the "big day" can feel overwhelming. Between the fear of scuffed hardwood and the technical mystery of slate leveling; it's natural to feel some pre-delivery anxiety. This pool table delivery and installation checklist is designed to transform that uncertainty into confidence and ensure your space is ready for a flawless setup.
We agree that your home deserves the same level of care as the table itself. You'll learn exactly how to clear a path for the delivery team, verify your room dimensions against the latest BCA standards, and prepare your floors for a multi-hundred-pound centerpiece. This guide previews the entire professional process. We cover everything from the initial arrival to the final, microscopic adjustments of the playing surface. By the time the installers depart, you'll have a perfectly level table and total peace of mind without a single scratch on your floors.
Key Takeaways
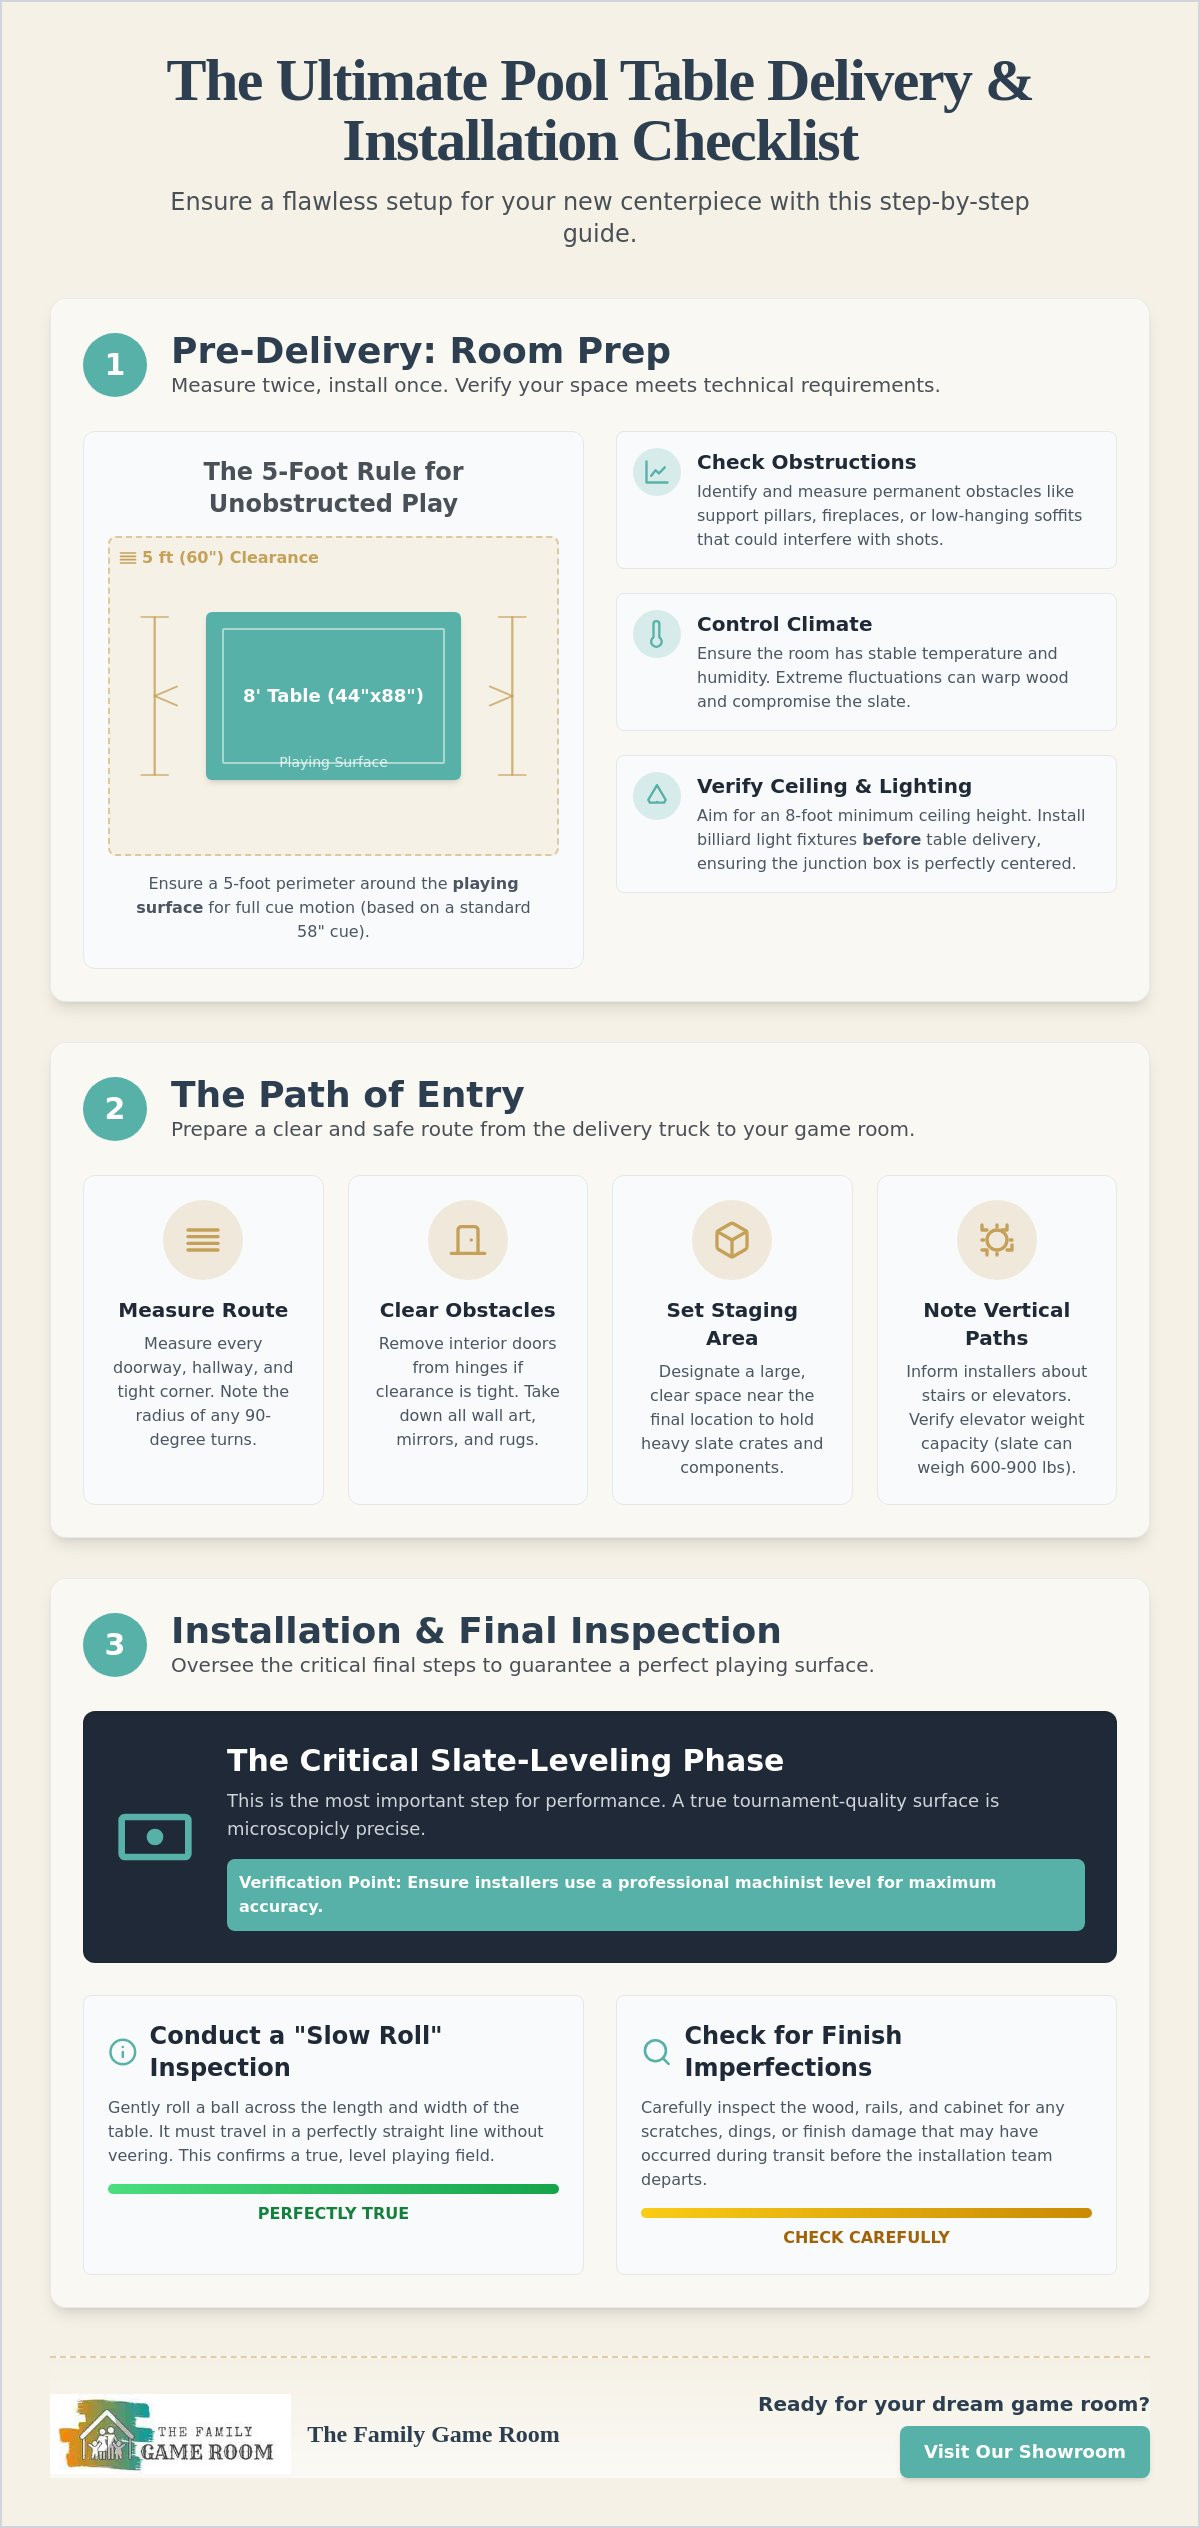
- Master the specific math of cue clearance to ensure a five-foot unobstructed perimeter around your table's playing surface.
- Follow this pool table delivery and installation checklist to audit your home's entry path, including measuring tight corners and removing interior doors if necessary.
- Prepare your flooring for heavy slate tables by assessing load-bearing capacity and allowing for the natural settling period on carpeted surfaces.
- Ensure a tournament-quality surface by verifying the use of a professional machinist level during the critical slate-leveling phase.
- Conduct a final "Slow Roll" inspection to confirm a perfectly true playing field and check for any transit-related finish imperfections.
Pre-Delivery: Room Dimensions and Clearance Requirements
Before the delivery truck arrives, you must look beyond the aesthetics of your new Billiard table and focus on the technical requirements of your space. A common mistake is measuring for the playing surface while ignoring the outer cabinet dimensions. While an 8-foot table typically features a 44" x 88" playing area, the actual furniture footprint is larger. You need to account for the width of the rails and the decorative cabinet when plotting your room layout. This first step in your pool table delivery and installation checklist ensures the equipment actually fits the room you've prepared.
Identify permanent obstructions that could interfere with a player's stance. Support pillars, fireplaces, and low-hanging soffits are often overlooked until a cue hits them mid-stroke. Beyond physical obstacles, verify that your game room is climate-controlled. Precision-engineered wood frames and slate beds are sensitive to humidity and temperature fluctuations. If a room is too damp or subject to extreme heat, the wood may expand, or the slate might shift, compromising the level surface your installers worked hard to achieve. Keep the environment stable to protect your investment for the long term. If you are also housing high-value vehicles in a similar space, you can find out more about specialized shields to keep them protected.
The 5-Foot Rule for Unobstructed Play
Precision play requires a full range of motion. The industry standard for a comfortable game is a minimum of 5 feet (60 inches) of unobstructed clearance around the entire perimeter of the table. This math is based on the standard 58-inch cue; you need those extra two inches to prevent the back of the cue from scuffing your walls during a full backswing. If your room has a specific "tight spot," you don't necessarily have to choose a smaller table. Many players keep shorter 48-inch or 52-inch "troubleshooter" cues on hand for shots taken near a wall or pillar. To be certain of your layout, use painter's tape to mark the table's exact footprint on the floor. This visual aid helps you confirm that your existing furniture won't crowd the players.
Ceiling Height and Lighting Alignment
Your ceiling height and electrical setup are just as vital as the floor space. Aim for a ceiling height of at least 8 feet to ensure players don't feel cramped and to allow for proper light diffusion. We recommend pre-installing your Billiard Light Fixtures before the table is delivered. It's significantly safer and easier for an electrician to work over an empty floor than to balance ladders around a heavy, felted table. Ensure the junction box is perfectly centered based on the table’s final resting position. Proper alignment prevents distracting shadows and ensures the entire playing field is illuminated with professional-grade clarity.
The Path of Entry: Navigating the Household
Your pool table delivery and installation checklist must account for the journey from the curb to the game room. Professionals don't just carry a completed table through your front door. They transport heavy, individual components that require significant maneuvering room. Start by measuring every doorway, hallway, and tight corner along the planned route. If a doorway offers less than an inch of clearance for the table frame or slate crates, remove the interior doors from their hinges. It's far easier to pop a few hinge pins than it is to repair a gouged door frame.
Clear the walls of all art and mirrors. Even a minor bump with a heavy rail can send a frame crashing down. Remove rugs and light furniture to create a wide, unobstructed lane for the installers. You also need to designate a "staging area" near the final installation site. This space should be large enough to hold three heavy slate crates and the disassembled frame components without blocking the installers' workspace. Professionals often reference guides like How to Disassemble a Pool Table to understand the reverse logic of a safe entry; knowing how these intricate components fit together is the key to a damage-free move.
Stairs, Elevators, and Tight Turns
Identify every vertical challenge before the delivery truck arrives. If your game room is on a second floor or in a basement, communicate the exact number of stairs to your professional team in advance. Elevators present a different hurdle. A high-quality 3-piece slate set can weigh between 600 and 900 lbs; you must verify that your building's elevator can handle this concentrated load alongside the crew. For homes with narrow landings or 90-degree turns, provide the installers with the radius of the turn. This transparency allows them to bring the right equipment, such as specialized dollies or extra personnel, to ensure a smooth transition. Once you've mapped your path, browse the premium selection at The Family Game Room to find a table that complements your home's layout.
Protecting Your Flooring During the Move
The sheer weight of slate can punish unprotected floors. Use Ram Board or heavy-duty corrugated cardboard to create a protective runway over hardwood or tile. Never allow movers to navigate over loose rugs or decorative runners; these are significant trip hazards when carrying hundreds of pounds of stone. Ensure the installation site is completely clean of dust and debris. A single stray pebble trapped under a heavy table leg can cause deep, permanent scratches in your flooring during the leveling process. A clean environment reflects the professional polish your home deserves.
Technical Site Preparation: Flooring and Infrastructure
Your flooring serves as the foundation for every shot you take. A premium slate table, such as those from American Heritage Billiards, can exert over 1,000 pounds of concentrated pressure on your subfloor. Before the crew arrives, verify that your floor's load-bearing capacity is up to the task. If you are planning to refresh your space with new surfaces, GW Flooring offers professional supply and installation of premium floor coverings that can withstand heavy loads. This is particularly vital for installations on upper levels or over crawl spaces. A weak subfloor can lead to subtle vibrations that disrupt the ball's roll, rendering even the most expensive table frustrating to use. As you finalize your pool table delivery and installation checklist, ensure the designated area is structurally sound and perfectly stable.
Modern game rooms often integrate technology directly into the furniture. If your selection includes integrated LED lighting or electronic scoring, plan your power access now. Avoid running extension cords across the floor, as these create permanent trip hazards and unsightly clutter. Instead, position the table near an existing outlet or have a floor box installed directly beneath the table's footprint. This foresight keeps the focus on the craftsmanship of your Nixon Billiards table rather than a mess of tangled cables.
Carpet vs. Hardwood Considerations
The material beneath the legs dictates your long-term maintenance schedule. On hardwood, tile, or polished concrete, installers use high-density shims for an immediate, permanent level. To prevent the table from "walking" or shifting on slick surfaces, consider using non-slip furniture pads designed for heavy loads. Carpeted rooms present a unique challenge: the table will naturally settle as the weight compresses the fibers and padding. Expect to schedule a professional re-level about 48 hours after the initial setup. While leg levelers allow for minor tweaks, traditional wood shims remain the gold standard for achieving a tournament-grade surface on deep-pile rugs.
Special Prep for Pool Table Dining Tops
If you've opted for versatile Pool Table Dining Tops, your preparation must extend to the surrounding social space. Ensure there is enough room for guests to pull out chairs comfortably without hitting walls or other furniture. You also need a dedicated storage plan for the dining leaves during active play. These heavy panels require a safe, padded area where they won't be knocked over or scratched. Finally, check the height of your seating. Standard dining chairs may feel too low for some hybrid tables, so consider coordinating your setup with high-quality Bar Stools or adjustable-height seating to ensure a comfortable experience for every guest.
Installation Day: The Professional Setup Process
The arrival of your installation crew marks the transition from preparation to realization. This stage of the pool table delivery and installation checklist is where precision engineering meets professional craftsmanship. It's a fascinating process to watch, but your role is to ensure the high standards of a "white-glove" service are met. Observe the frame assembly closely. A stable game starts with a frame where every bolt is torqued to exact manufacturer specifications. If the frame isn't rigid, the slate will eventually shift, regardless of how well it's leveled. Professionals level the frame itself before the heavy slate sections are even positioned.
Watch the tools your installers use. A standard carpenter’s level is sufficient for hanging a picture, but it's inadequate for a tournament-grade playing surface. Expert installers utilize a machinist level, which is sensitive enough to detect variations as small as .0005 inches per foot. This level of microscopic accuracy is what ensures a ball won't "drift" during a soft shot. Once the frame and slate are perfectly true, the crew will begin waxing or puttying the seams. This process fills the tiny gaps between slate sections, creating a single, monolithic surface. A properly prepared seam is the difference between a professional table and a recreational toy.
The 3-Piece Slate Leveling Protocol
A high-quality table uses a three-piece slate system for superior stability and ease of transport. Each piece must be leveled individually using metal shims placed between the slate and the frame. Only after each section is perfectly planar do the installers join them together. They typically use melted beeswax or a specialized slate putty to bridge the seams. Once the material dries and is scraped flush, perform the "fingernail test." Run your nail across the seam; you should feel absolutely no ridge or gap. This seamless transition is non-negotiable for consistent play and long-term cloth health.
Felt and Pocket Installation
The final aesthetic touch is the application of the cloth. Whether you've selected a professional-grade Simonis worsted wool or a standard blended felt, the tension must be uniform. The cloth should be drum-tight with no visible ripples or "ghosting" when you brush your hand across it. Uneven stretching leads to premature wear and unpredictable ball speed. Finally, inspect the pocket liners. They should be seated securely with proper clearance to allow balls to drop without snagging. If you're ready to start this journey with a premium brand, shop our full inventory of Nixon and American Heritage pool tables to find your perfect match.
Final Inspection and Accessory Integration
Before the installers pack their tools, you must perform a rigorous final audit. This final phase of your pool table delivery and installation checklist is where you verify that the technical precision of the previous hours translates into a perfect playing experience. Start with the "Slow Roll" test. Roll a billiard ball gently across the width and length of the table, specifically targeting the seams where the slate sections meet. The ball should move in a perfectly straight line without any drift or "wobble" as it loses speed. If the ball curves or deviates from its path, the leveling requires immediate adjustment before the crew departs.
Stability is equally important for consistent play. Lean against the rail as if you're lining up a difficult bridge shot. The table shouldn't budge or creak under your weight. A high-quality frame should feel like a permanent extension of the floor. While you're at the table, perform a thorough visual inspection of the wood finish. Check the legs, apron, and rails for any nicks or scratches that might've occurred during transit or the assembly process. It's much easier to address finish issues while the professionals are still on-site with their specialized touch-up kits.
The Professional Sign-Off Checklist
A truly professional installation involves testing the level at six distinct points: the four corners and the center of each long rail. Don't just take the crew's word for it; ask to see the machinist level at each of these spots to confirm the reading. Next, test the rail bounce. Roll a ball firmly against the cushions from various angles. It should rebound with a crisp, consistent energy without any "thudding" sounds or dead spots. Finally, ensure all assembly hardware is either hidden by the design or capped with the appropriate decorative covers. This attention to detail separates a luxury home installation from a standard commercial setup.
Organizing Your Game Space
Once the table is certified for play, focus on the surrounding environment to complete the room's transformation. Verify the installation of your Pool Cue Racks to ensure your cues are stored vertically to prevent warping over time. Integrate matching Bar Stools to provide comfortable vantage points for spectators and players waiting their turn. These final touches transform a simple room into a curated entertainment hub. Ready to upgrade your home with a centerpiece of craftsmanship? Explore our American Heritage Billiards Pool Tables buyer's guide for the ultimate home entertainment experience.
Ready Your Home for a Lifetime of Play
Transforming your living space into a professional-grade game room requires more than just picking a beautiful design. By following this pool table delivery and installation checklist, you've mastered the critical steps of room clearance, floor preparation, and technical oversight. You now understand that a five-foot perimeter and a stable, vibration-free subfloor are essential for tournament-quality performance. These details ensure your table isn't just a piece of furniture; it's a precision instrument built for generations of enjoyment.
As a family-owned and operated business since 2022, we take pride in being an authorized dealer for Nixon Billiards. We provide white-glove professional installation available nationally, ensuring your setup is handled by experts who value your home as much as you do. Don't leave your entertainment to chance. Browse Our Premium American Heritage Billiards Collection today and let us help you curate the perfect social hub for your family. Your inaugural game is just a few steps away; we're excited to help you make it flawless.
Frequently Asked Questions
How long does a professional pool table installation take?
A professional installation typically takes between two and four hours. This timeline includes the frame assembly, individual slate leveling, and the precision stretching of the cloth. Larger tables or complex room access might extend this duration slightly. Your installers will work through each step of the pool table delivery and installation checklist to ensure the final product meets tournament standards before they depart.
Do I need to be home during the delivery and setup?
You or a trusted adult should definitely be present during the entire setup. Your primary role is to designate the final resting spot and supervise the path of entry. Once the work is complete, you'll need to perform the final inspection and sign off on the craftsmanship. Being on-site allows you to address any immediate concerns regarding floor protection or furniture placement.
What is the difference between 1-piece and 3-piece slate installation?
Three-piece slate is the gold standard for residential tables because it allows for microscopic leveling adjustments across the entire playing field. One-piece slate is common in commercial bar environments where heavy-duty durability outweighs precision leveling. Because three pieces are joined with beeswax or putty, they create a smoother, more reliable surface for technical play than a single, massive slab of stone.
Can I move the pool table myself after it has been installed?
You should never attempt to move a slate table yourself after it's been leveled. Shifting the table even a few inches can pop the slate seams or crack the stone at the bolt points. If you need to relocate the table for a renovation, call a professional team. They'll disassemble the components safely to protect the integrity of the frame and the precision of the slate.
How long should I wait to play on the table after installation?
You can start your inaugural game as soon as the installers finish their final inspection. If your table is set up on deep-pile carpet, keep in mind that the weight will cause the legs to settle over the first 48 hours. While you can play immediately, you might need a professional re-leveling service once the carpet padding has fully compressed under the table's weight.
What should I do if my floor is not perfectly level?
Don't worry if your subfloor isn't perfectly flat. Professional installers use high-density shims and machinist levels to compensate for uneven flooring during the assembly. The goal is a level playing surface, not necessarily a level room. As long as the floor is structurally sound and can support the weight, the installation team can create a tournament-grade environment on almost any surface.
Do installers provide the felt, or do I need to buy it separately?
Most premium retailers include a high-quality felt with your table purchase. You'll typically choose your cloth color and grade during the ordering process. It's best to confirm this with your dealer well in advance of delivery. Having the felt included in your pool table delivery and installation checklist ensures that the installers have everything they need to complete the job in a single visit.
How much space is needed for a 7ft vs 8ft pool table?
A 7-foot table requires a minimum room size of 13' x 16' for comfortable play with standard 58-inch cues. If you've selected an 8-foot home-size table, you'll need at least 13' 4" x 17' of clearance. These dimensions provide the five feet of unobstructed space needed for full backswings. If your room is slightly smaller, using 48-inch or 52-inch cues can help you navigate the tight spots.